How To Turn An Antique Dresser Into A Vanity
Last Updated on December 4, 2024
Two more weeks until the One Room Challenge final bathroom makeover reveal. This week’s post is a DIY of how to turn an antique dresser into a vanity. I’m at that point where I’m so close I can almost taste it. The light is shining bright at the end of the tunnel with only a few minor bumps in the road…backorder sconces and sink, but nothing too bad.
What started out as a blah, boring, beige and brown bathroom, is now transforming into what dreams are made of. Gerry has been kicking some serious butt…BTDubs, when the contractor gets more excited than you about your project, then you know it’s going to be really good. He and I are quickly becoming besties…bonding over what my son has deemed “Potty Paradise.”
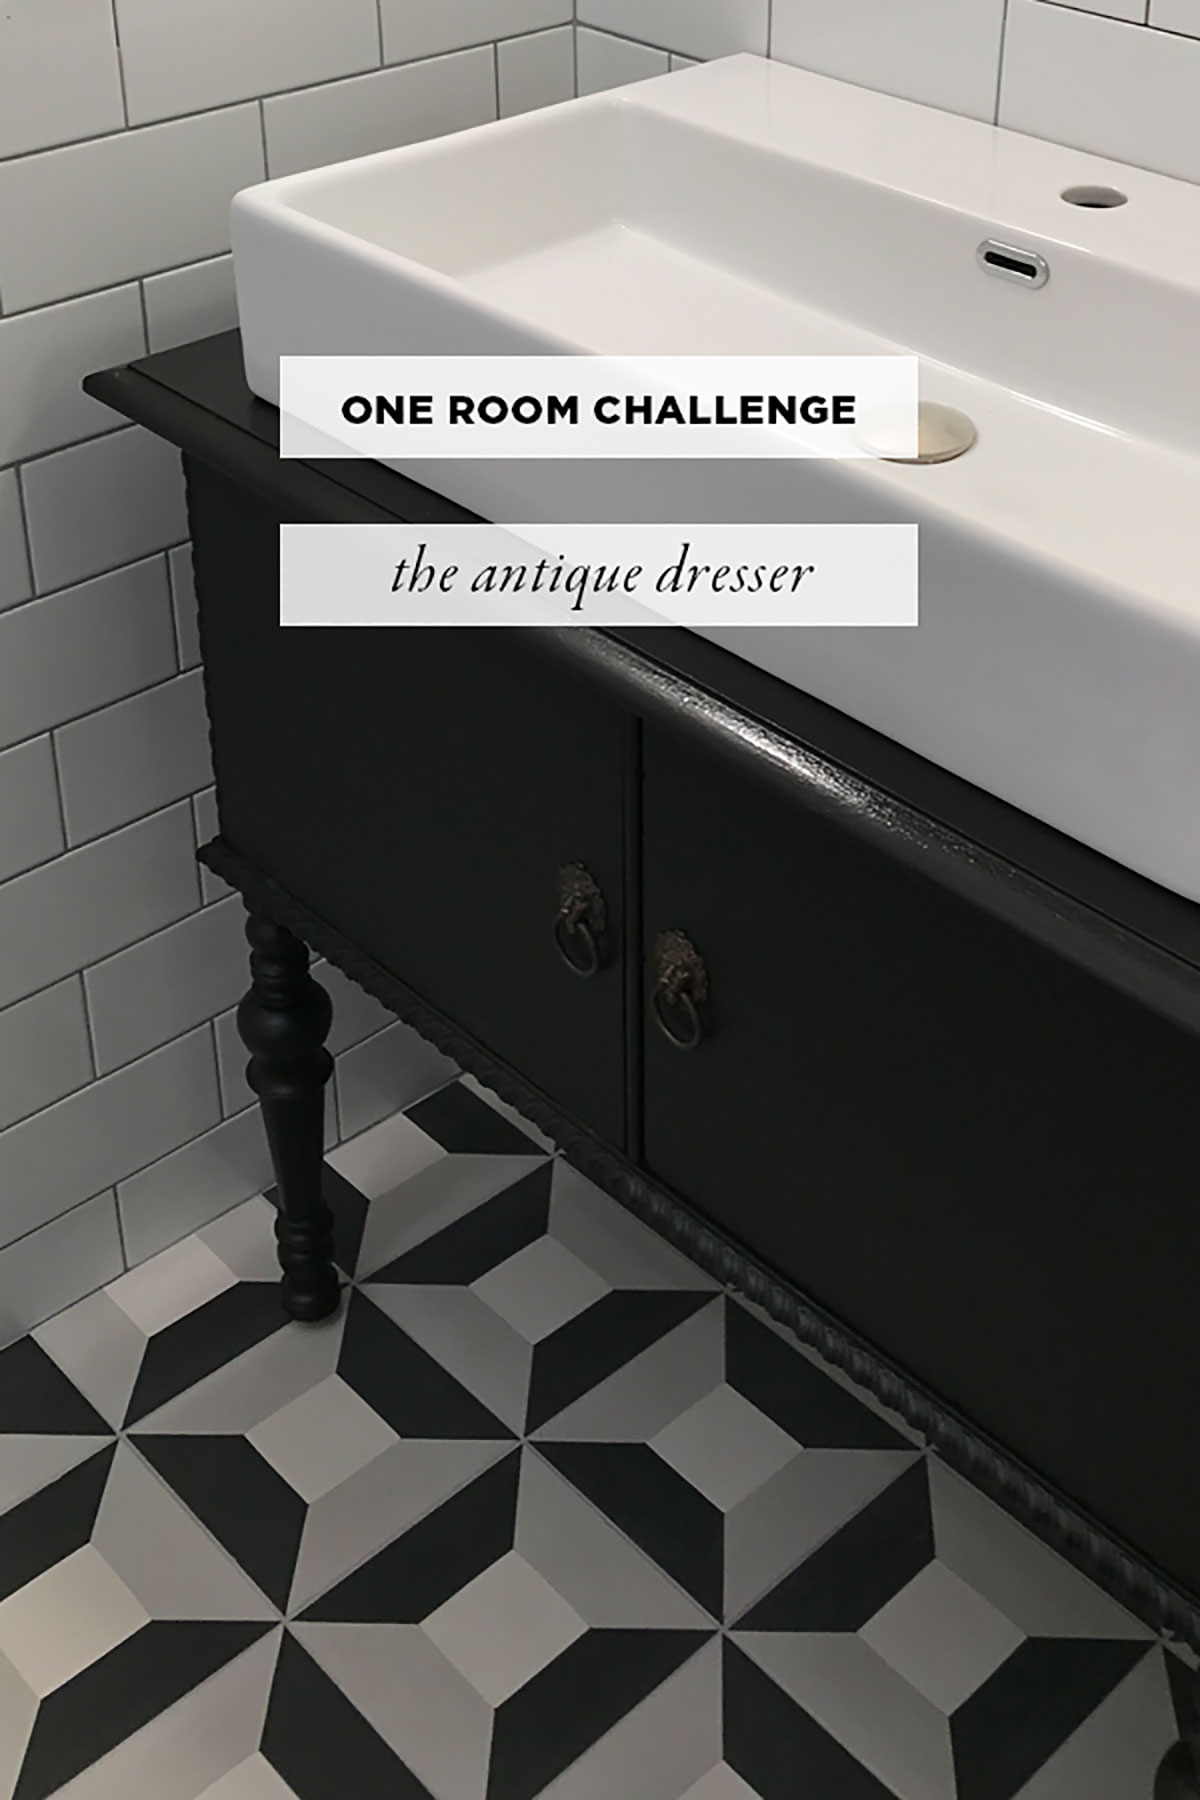
Last week I left off with the finished tile install. I chose a design called Cubicon by Clé Tile for the floor and white subway tile halfway up the walls from Clé’s Basic Collection. The Boy was stressing big time about the chaos until the toilet was removed from the living room and installed in its proper place…up next was the vanity. Now it was time for me to hyperventilate. My biggest concern about this project was protecting the top from water. I’ve been stressing about water since the day we started this project.
Before we moved, I purchased an antique dresser knowing it would eventually be turned into a bathroom vanity…I just didn’t realize it would happen so quickly. Considering we just bought the house, reno plans weren’t exactly top of mind…but a happy accident resulting from the flooded basement sped everything up. Anyhoo, the antique dresser was in pretty rough shape, so we needed to spruce her up a lil’ bit. Give her a little rub and buff. Here’s the DIY on how we turn an antique dresser into a bathroom vanity and protect the top from water.
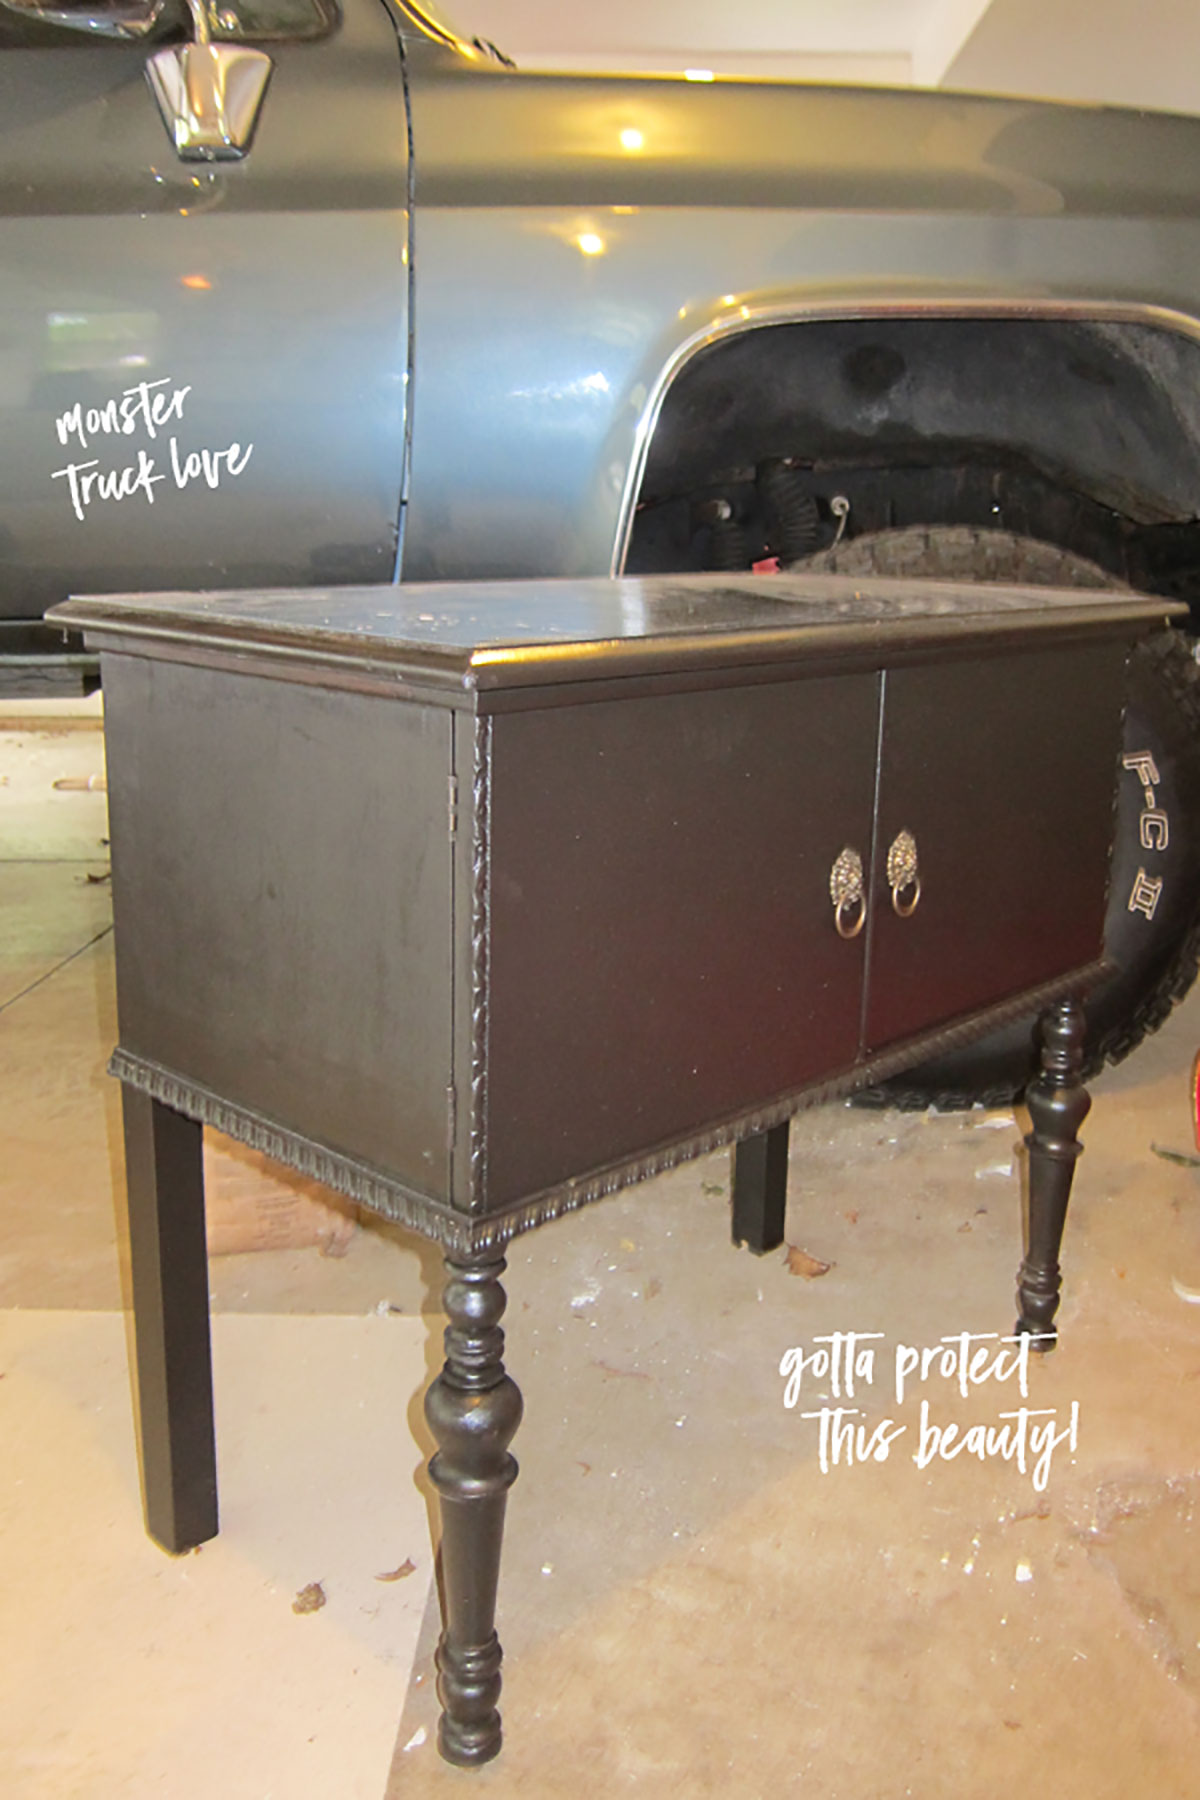
So being perfectly honest here, The Boy did most of the dirty work on this DIY…but I say “we” in the instructions because I was there and witnessed it. That counts as we, right? First, we sanded the top exterior with fine-grit sandpaper. Just to rough up the surface a bit and give the paint a little something extra to hold on to. Then we took tack cloth to remove any dust and dirt…we went over the cabinet a couple of times. When we opened the doors we found an old wasp nest…LOL…The Boy and Gerry poked at it with a stick, but it was pretty old petrified…as were the two boys, shhh, don’t tell them I said that.
Like I said before, my biggest concern was protecting the top from water. I didn’t want it staining the wood or leaving watermarks. Since I have a 4 and 6-year old, my antique dresser needed to be able to take some abuse. This bathroom is used for hand washing after every meal, and it’s also the only one on the main floor, so every guest uses it. Part of me wonders why on earth I picked something so fragile for such a heavily used space. Maybe this idea was no bueno…but backing out was not an option. Not now at least. Besides, it sure looks purdy!

I did a lot of research on how to protect an antique wood dresser from water and got a lot of different answers. I also reached out to some of my favorite DIY bloggers. Most of the solutions were for natural wood, but nothing really cut and dry for a painted antique dresser. I got tips, including waterproofing with a marine varnish…but supposedly, it had the possibility of drying with a yellow hue, and I didn’t want to chance that. There was an idea of using Waterlox, but that was only for natural, stripped wood. There were oil-based paint solutions, but that needed to have a certain temperature and crazy long drying times…like 10-20 days total from start to finish with multiple coats. I needed a One Room Challenge, fly by the seat for my pants, one coat, fast solution.
The Boy set off for a Home Depot adventure to find me ideas and returned with paint swatches and a solid solution. The HD paint department suggested using Behr Marquee One Coat Interior Satin Enamel and a coat or two of Rust-Oleum Painter’s Touch 2X Ultra Cover in Matte Clear…with fingers crossed we decided to go for it.
Choosing black paint was almost as difficult as picking white paint. I ended up choosing a swatch called Blackout. It’s more of a deep charcoal versus jet black…a bit of a softer look to it. I’m also going back and forth on polishing the lion head hardware. What do you think?
The Boy slapped on one coat of the Behr paint, and much to my surprise, the coverage was great! The Rust-Oleum spray went on thicker than expected, which made us both nervous, but it evened itself out. We breathed a sigh of relief when it was all said and done. Now it was Gerry’s turn, and I had to dare myself to watch and document him taking a saw to my precious antique dresser. One slip and we would be back at the old drawing board, and the last thing I wanted was a normal bathroom vanity.
Let’s Turn An Antique Dresser Into A Vanity
He measured where the drain came out of the wall and found the middle…based on what he discovered during the gut, Gerry was surprised the plumbing was pretty much dead center. Ya, this tiny little bathroom was a bugger chucked full of surprises.
Soon it was time to drill the first hole in the dresser. Like butter! Gerry carried it inside, and it fit, but the legs weren’t level. Back and forth, he went sanding one leg a smidge, carrying it back in…janky leg. Carried it back out, sanding one leg a smidge, janky leg. He cursed that thing inside and out and finally won the battle of perfectionism. Woohoo Gerry!
I think the most difficult part of this whole project, besides the legs being janky was finding a sink to fit. Because I was so worried about protecting the top from water, I wanted to cover a good portion of the surface with the sink. I also wanted to add height. After committing to the project, I started my search thinking no problem mon. Well, there was a problem. My antique dresser was only 18″ deep, and that included a lip, so I needed to find a sink that was less than 17″ deep total, including the faucet area. Remember, I already have tile up at this time, and can no longer have plumbing come out of the wall. Insert monkey emoji covering its eyes. Crap. My options were limited, and I needed this sink here yesterday.
We found one, and after ordering it, it was suddenly on backorder—double crap. The Boy tried helping while I wrote my last blog post…it resulted in him texting me once every 20 seconds, “What about this? What about this? What about this? What about this? This one? How about this one? We are never going to find anything. We’re screwed. Gerry’s gonna kill you. Wait, this one? What about this one? This one might work. Do you like this one?” What can I say? At least he tried. I found one at Modo Bath that was wall-mounted, 16.1″ deep, and could be overnighted. Phew! Dodged that bullet. It fits perfectly. Gerry and I stood back and admired how we turned an antique dresser into a vanity. I’m sorry, but this space looks kick-ass.
Now that the vanity and sink are installed, do you know what time it is??? It’s wallpaper time! Woot! Woot! Gerry found this lovely lady named Renee, who owns Paper Dolls Wallpaper Hanging…all I can say is she is a genius! Wallpaper is an art. It takes serious talent and patience to hang, especially when you have crazy paper like this with a wild repeat. Want a sneak peek before next week??? Promise you’ll return to see more next week if I show you. Pinky swear??? AHHHH! I can’t even stand it…I just gotta share!!!!!!!
A SLOTH IS SMOKING A HOOKAH IN MY BATHROOM!!!!!!!!!!!!! THERE’S A BADGER WEARING A PIRATE’S EYE PATCH AND DRINKING A PINA COLADA!!!!!! I’M DYING! That’s a wrap on Potty Paradise for this week.
More Eclectic Home Decor Ideas and Interior Design Tips
This beginners cricut project will have you making kitchen towels for everyone in your family.
If you’re a brand looking for a UGC content creator, you’ve hit the jackpot. Meet Kyla Herbes, a home decor influencer living in Chicago.
This artificial flower arrangement in resin is the perfect weekend project.
This marble dipped mugs DIY went viral years ago and is still to this day a top post. See what all the fuss is about.